Like many home cooks, I fall into routines and habits that are easy and comfortable. One piece of kitchen equipment that I had been using fairly regularly throughout the spring and summer, my Instant Pot, recently had been sitting idly in a cupboard for the last several weeks. So when I was meal planning last week, I went in search of an Instant Pot recipe that I could throw into the rotation. Skinny Taste, one of the best recipe sites I found, has many Instant Pot recipes and – bonus – each recipe on the website lists nutrition information. For me, at this time of year, it is important to keep tabs on what I’m consuming in order to avoid overeating.
This was a tasty and warming dish on a cold December night, one that I’ll no doubt go back to many times. I stay away from full fat coconut milk as a personal choice, substituting the lower fat product, which I don’t believe made a difference in taste.
1/2 TBSP ghee, butter or coconut oil for df (I used coconut oil)
1/2 chopped onion
3 cloves garlic, minced
1 tsp grated ginger root (fresh – not the powder!)
1 tsp ground coriander
1 tsp cumin
1/2 tsp turmeric
1/2 tsp garam masala
1/4 tsp cayenne pepper
1/4 tsp ground cardamom
14 ounce can diced tomatoes, drained
2 C cauliflower florets
1/2 C frozen peas
1/2 C full fat canned coconut milk (I used low fat)
1/4 C fresh cilantro leaves, for serving
Method
Season chicken with 1 teaspoon salt.
Press saute button on Instant Pot and melt the butter,
Add onion, garlic, ginger and 6 spices (from coriander to cardamom) and saute until the vegetables are soft and the spices are fragrant, about 2 to 3 minutes.
Add the tomatoes and use an immersion to blend until smooth (or blend in the blender) (here’s where I just mashed up the diced tomatoes a bit with a fork – I kind of liked the chunckiness).
Add the chicken, remaining 1/2 teaspoon salt and stir, cook high pressure 15 minutes. (You may need to add about 1/4-1/2 cup of liquid to the Instant Pot so there’s plenty of liquid – refer to your Instant Pot’s cooking instructions)
Quick release.
Add the cauliflower and peas and cook 2 minutes on high pressure.
Quick release, stir in coconut milk and serve garnished with cilantro.
These peanut butter cookies have been a family cookie tradition for a lot of years and, honestly, they never get tired! Bakers can find a ton of “variations” on the original out there; in fact this recipe was recently published in the New York Times and adapted from the Gerraro Family.
The version I first remember baking came from a Pillsbury Bake-Off “cookbook” which was in reality a collection of winning recipes from the Pillsbury Bake-Off for a particular year. The Internet – which of course never lies – tells me Peanut Butter Blossoms was one of the 1957 winners. Now I wasn’t old enough to be baking cookies in 1957, but it wouldn’t surprise me that my Mom or Grandmother had this cookbook in their possession. Originally called Black-Eyed Susans by Bake-Off Winner Freda Strasel Smith, Pillsbury changed the name to Peanut Butter Blossom when the recipe was published. No matter what they are called, they are delicious!
Recipe adapted by the New York Times from a Gerraro Family Recipe
Ingredients
1 ¾ cups all-purpose flour
1 tsp baking soda
½ tsp salt
1 stick butter, at room temperature
½ cup smooth peanut butter
½ cup granulated sugar, plus more for rolling
½ cup light brown sugar
1 large egg
1 TBSP milk
1 tsp vanilla
Nonstick spray or vegetable oil for cookie sheet (optional) (I used baking parchment)
5 dozen Hershey’s Kisses, foil removed
Method
Sift together flour, baking soda and salt; set aside.
Using an electric mixer, cream together butter, peanut butter, 1/2 cup granulated sugar and light brown sugar.
Add egg, milk and vanilla; beat until well blended. Gradually add flour mixture, mixing thoroughly. If the dough is very soft, refrigerate for about 1 hour (this is an important step!).
Preheat oven to 375 degrees. Spray, oil or line a cookie sheet with nonstick liner and set aside.
Roll dough into 1-inch balls.
Roll cookies in sugar and place 2 inches apart on cookie sheet.
Bake until very light brown and puffed, 6 to 8 minutes. Remove sheet from oven and lightly press a candy kiss into center of each cookie, allowing it to crack slightly.
Return to oven until light golden brown, 2 to 3 minutes.
Remove from oven, cool completely and store in an airtight container.
Now that we’ve passed Thanksgiving, the Holiday Baking season has begun in earnest in our kitchen. As our granddaughter has an egg allergy, we are always on the hunt for egg-free recipes and this one from Kelly Rudnicki, author of The Food Allergy Mama’s Baking Book, was a hit. In addition to the usual ball shaped cookies, I was able to roll out a well-chilled portion of dough and shape cut-outs for our traditional cookie decorating tradition with our granddaughter. Baking without eggs can be challenging, but this delicious cookie proves it can be delicious and safe for those with food allergies.
Using an electric mixer fitted with the paddle attachment, mix together shortening, brown sugar, applesauce, and molasses until well combined.
In a medium bowl, whisk together flour, baking soda, cinnamon, ginger, cloves, and salt.
Slowly add flour mixture to shortening mixture; mix until combined.
Transfer dough to refrigerator and let chill for 1 hour.
Preheat oven to 375 degrees. Line a baking sheet with parchment paper; set aside.
Form dough into 1-inch balls. *
Place granulated sugar in a shallow dish; roll each ball in sugar. Place on prepared baking sheet and sprinkle a few drops of water onto each ball using your fingers.
Bake until lightly browned, 12 to 14 minutes.
Let cookies cool completely on baking sheet before serving.
* rolling this soft dough to form cutouts is a challenge but it can be done as long as the dough stays very cold and the rolling surface is well floured. The best cutters to use are those that are medium-sized and fairly simply shaped.
If you’ve not been perusing the website, SkinnyTaste, you’ve been missing out on some incredibly delicious recipes. This one popped up when I was looking for a good, solid vegetarian black bean chili, and with the addition of a spicy yogurt topping, it did not disappoint. This recipe comes together in short order, a feature one can’t under-value during these busy weeks!
The recipe posting has many tips for variations and, as we are just a household of empty-nesters, the ability to scale up or down was a feature.
When I make cauliflower soups, I never think of creamy soups with a milk base. Adding tomato to this soup base was genius – something I had previously not thought of trying. After tasting this recipe, I’ll definitely correct that omission.
With a tomato-based broth and the addition of coconut milk, this warming soup was reminiscent of a delicious Indian curry. It made at least 8 servings which meant we have enough to put aside in the freezer for another evening meal. I’ll admit to a couple of short cuts that did not seem to impact the quality – one being that I used frozen cauliflower florets (slightly thawed before roasting), and to cut back on sodium, I used water in place of a vegetable broth.
1 small head cauliflower, cut into small florets (about 6 cups) [I used frozen]
2 tablespoons extra-virgin olive oil, divided
1 large onion, chopped
1 cup diced carrot
3 large cloves garlic,
minced 1 ½ teaspoons grated fresh ginger [FRESH ginger, not the powder please]
1 fresh red chile pepper, minced, plus more for garnish
1 (14 ounce) can no-salt-added tomato sauce
4 cups low-sodium vegetable broth
3 cups diced peeled russet potatoes (1/2-inch)
3 cups diced peeled sweet potatoes (1/2-inch)
2 teaspoons lime zest
2 tablespoons lime juice
1 (14 ounce) can coconut milk
Chopped fresh cilantro for garnish
Method
Preheat oven to 450 degrees F.
Combine coriander, cumin, cinnamon, turmeric, salt, pepper and cayenne in a small bowl.
Toss cauliflower with 1 tablespoon oil in a large bowl, sprinkle with 1 tablespoon of the spice mixture and toss again. Spread in a single layer on a rimmed baking sheet. Roast the cauliflower until the edges are browned, 15 to 20 minutes. Set aside.
Meanwhile, heat the remaining 1 tablespoon oil in a large pot over medium-high heat. Add onion and carrot and cook, stirring often, until starting to brown, 3 to 4 minutes. Reduce heat to medium and continue cooking, stirring often, until the onion is soft, 3 to 4 minutes.
Add garlic, ginger, chile and the remaining spice mixture. Cook, stirring, for 1 minute more.
Stir in tomato sauce, scraping up any browned bits, and simmer for 1 minute.
Add broth, potatoes, sweet potatoes, lime zest and juice. Cover and bring to a boil over high heat. Reduce heat to maintain a gentle simmer and cook, partially covered and stirring occasionally, until the vegetables are tender, 35 to 40 minutes.
Stir in coconut milk and the roasted cauliflower. Return to a simmer to heat through.
Serve garnished with cilantro and chiles, if desired.
Last week, I used buttermilk in a casserole, but then had a significant amount leftover. What do you do with almost an entire quart of buttermilk? I started by trolling the Internet for a few ideas and found this bread recipe on Butter with a Side of Bread.
The breads I bake tend toward whole grains and sour doughs, so this was a different kind of recipe than we are used to. What came from the oven was a hugely fragrant and soft loaf with a hint of tang which reminded me of dinner rolls. Delicious – and a quick and simple bake!
If serendipity again leaves most of a quart of leftover buttermilk in my refrigerator, I know what I’ll do to make good use of it. Homemade Buttermilk Bread is a winner!
1 1/2 cups buttermilk (can simulate this by adding lemon juice to regular milk in a pinch)
2 TBSP melted butter (I used a neutral oil)
2 TBSP sugar
1 tsp salt
3 1/2 cups AP or bread flour (I used bread flour)
1 TBSP yeast
Method
Combine buttermilk, butter and sugar in a mixing bowl.
In a separate bowl (I used my mixer with dough hook), combine the dry ingredients including the yeast. Whisk together to combine.
Now add the buttermilk mixture. Mix to combine (adjust liquids or dry ingredients to make the right consistency for bread dough).
Mix the dough on low for 6-7 minutes or knead by hand for 10 minutes. This is critical.
Cover the dough and let rise in a warm place (oven proofing settings are great) for about 1 hour until the dough is doubled in size.
Punch down dough and knead several times. Shape into a loaf and place into a greased loaf pan. Cover and return the dough to a warm spot to rise for another 30-45 minutes.
Preheat the over to 350 degrees Fahrenheit. Bake dough for 30-35 minutes until the top is golden brown. Cool and slice.
Same Cook, Different Book: Mollie Katzen’s Mushroom Yogurt Pie with Spinach Crust
Cookbook author, illustrator, cook. Mollie Katzen has been and continues to be a multi-talented culinary force. Whenever I’m looking to try something plant-based and new, her many cookbooks are invaluable. I was recently reminded of this wonderful yogurt and mushroom-based pie found in The Enchanted Broccoli Forest originally released in 1995 and revised in 2000.
As I had no wheat germ on hand, I substituted 1/4 cup of ground flax seeds for the 3/4 cup wheat germ. I feel that as flax can sometimes have a strong taste, that worked for me. I also used 0% Greek yogurt as that’s what I had on hand.
No matter whether you stay true to the original or tweak things a bit to accommodate what’s in your kitchen stores, this pie is a keeper.
Mollie Katzen’s Mushroom Yogurt Pie with Spinach Crust
Katzen, M. The Enchanted Broccoli Forest. (2000). Berkeley, CA: Ten Speed Press.
Ingredients
For the Spinach Crust
3/4 pound (12 oz) spinach, chopped very fine
3 tablespoonsbutter
3/4 cupunbleached white flour
3/4 cupwheat germ (I substituted 1/4 cup ground flax seeds)
1/4 teaspoonsalt
Dash of nutmeg
For the Mushroom Yogurt Pie Filling
1 Spinach crust (above)
1 tablespoon butter
1 cup minced onion
1/2 teaspoon salt
12 ounces mushrooms, sliced
2 tablespoons fresh lemon juice
3 tablespoons flour (white or whole wheat)
1 egg (at room temperature)
1 cup firm yogurt (at room temperature) (I used Greek-style, 0% Fat)
1/2 cup grated cheddar
1/4 cup freshly minced parsley
Lots of fresh black pepper
Extra cheddar (for the top)
Paprika (for the top)
Method
For the Spinach Crust
Preheat the oven to 375° F.
Melt the butter in a cast-iron skillet (I used a regular skillet that can stand high heat), add the spinach, and cook it quickly over fairly high heat, stirring, until it is just limp.
Remove from heat, add remaining ingredients, and mix well.
Pat into a buttered 9-inch pie pan. Use a fork first, then your fingers, to mold the crust. Pre-bake for 15 minutes at 375° F.
For the Mushroom Yogurt Filling and Finishing
Preheat the oven to 350° F.
In a large, heavy skillet, cook the onions in butter with salt, until the onions are soft (5 to 8 minutes).
Add the mushrooms and the lemon juice. Cook, stirring, over medium heat, about 5 to 8 more minutes.
Gradually, as you stir, sprinkle in the flour. Keep cooking and stirring over medium-low heat another 8 to 10 minutes. Remove from heat.
Beat together the egg, yogurt, pepper, cheddar, and parsley. Stir the mushroom saute into this mixture, then beat it well.
Turn the filling into the pre-baked crust (you don’t need to cool the crust first). Top with extra cheese and paprika.
If a recipe can be adapted for whatever I have on hand, well, that’s a recipe for me! Dorie Greenspan, a terrific food columnist found in the New York Times, a cookbook author and a baker is my hero in this regard. Oftentimes one of her recipes can be adapted in multiple ways which suits the way we cook and eat perfectly.
In this meatball soup recipe, I made the full amount of meatballs, but used just half for our evening meal. The other half recipe has been stowed away in the freezer for another evening, or as Dorie suggests, to use in a bean dish or as a sandwich filling.
The full recipe can be found in Everyday Dorie (link will direct you to local independent bookstores) beginning on page 75 or on Dorie Greenspan’s website (link in the recipe title). I served the soup up with some freshly baked bread and Sriracha sauce. Honestly, though, whatever add-ins float your boat, this recipe is both delicious and warming – the perfect antidote for cool Fall evenings.
Greenspan, D. Everyday Dorie: The way I cook. (2018). New York: Houghton Mifflin. p 75.
Ingredients
For the meatballs
1 large egg
1⁄4 cup plain yogurt, preferably Greek (I used 0% Fage)
1⁄2 cup finely chopped onion, rinsed and patted dry
1⁄2 cup chopped fresh cilantro, basil or a mix
1⁄2 cup unseasoned dry bread crumbs
2 garlic cloves, germ removed, and finely chopped
1 teaspoon grated peeled fresh ginger
Finely grated zest of 1 lemon
1 teaspoon fine sea salt
1⁄2 teaspoon freshly ground pepper
1 pound ground turkey, preferably organic
2 1⁄2 quarts chicken broth
For the soup
1⁄2 pound rice noodles (sticks or straight- cut)
About 4 cups (about 600 grams) chopped, sliced and/ or shredded mixed vegetables, such as peeled carrots, onions, mushrooms, cabbage (Napa or green), mustard greens, kale and/or spinach (I used a mix of half fresh baby spinach and half frozen mixed veg. Next time around, I’ll know to set aside the extra veggies from a week’s cooking)
Fine sea salt and freshly ground pepper
1⁄3 cup chopped fresh herbs, such as cilantro, basil, parsley and/or mint
Soy sauce, Asian sesame oil, rice vinegar and Sriracha, for serving (To know me is to know I chose Sriracha)
Method
WORKING AHEAD: You can make the meatballs ahead. Uncooked, they can be kept in the refrigerator for up to 6 hours. Once cooked, you can refrigerate them in some broth for up to 4 days or freeze them in an airtight bag for up to 2 months. The broth can be made up to 4 days ahead and kept in the refrigerator. (This is exactly what I did – empty nesters rejoice!)
TO MAKE THE MEATBALLS: Put the egg in a large bowl and stir with a fork to break it up. Add all the remaining ingredients except the turkey and broth and lightly stir, toss and mix to blend. Add the meat and, using the fork and then your fingers, turn and mix — again, go easy — until blended.
Using a medium cookie scoop (one with a capacity of about 1 1⁄2 tablespoons) or a tablespoon, scoop out meat- balls (you’ll get 24 to 30), then roll them between your palms to round them. (At this point, you can cover the meatballs and refrigerate them for up to 6 hours, or freeze them on a lined baking sheet until they’re solid, then pack them in an airtight bag.)
Bring the broth to a boil in a large pot, then lower the heat so that it simmers.
Drop the meatballs into the broth and, keeping it at a light, steady simmer, poach them, turning them over once, until cooked through, about 8 minutes. You’ll probably want to do this in batches. Using a slotted spoon, transfer the meatballs to a large bowl. The broth will be a little murky. If you’d like it to be clearer, line a strainer with dampened cheesecloth (or a triple layer of dampened paper towels) and pour the broth through it into a bowl; rinse out the pot. (You can put the meatballs in a container and freeze them for up to 2 months. Or cover with broth and refrigerate for up to 4 days; refrigerate the remainder of the broth separately.)
TO MAKE THE SOUP: Bring a large pot of water to a boil. Drop in the rice noodles and cook for 4 minutes, then drain and transfer the noodles to a large bowl. Cover with cold water, toss in a few ice cubes and set aside until needed.
Bring the broth to a boil in the pot, then lower the heat so that it simmers. If your meatballs have been frozen, drop them into the broth and cook for 10 minutes; if chilled, cook for about 5 minutes; and if just made, sim- ply drop them in. Add the vegetables to the pot and sim- mer for about 5 minutes. (If you’re using carrots, they’ll remain slightly firm.) Drain the noodles, add them to the pot and cook until hot — they’ll heat very quickly. Taste for salt and pepper.
Ladle the soup, noodles and meatballs into deep bowls, dividing them equally. Sprinkle over the herbs and serve with the soy sauce, sesame oil, vinegar and Sriracha. Encourage everyone to season to taste.
Dorie Greenspan has some terrific serving suggestions (Choices) and storage instruction on p 77.
My Moosewood Cookbook, purchased back in 1977, was one of the first books from which I learned to cook. Over time, its yellowing pages have introduced us to some delightful recipes and, of course, vegetarian cooking. The Moosewood Collective is still going strong and Mollie Katzen, one of the originals links to a 40th Anniversary Edition on her website.
We like to plan a soup meal about once a week, and this Curried Squash and Mushroom Soup, seemed like a perfect way to ease into the New England shoulder season – that patch of time between late summer and early fall.
I have to admit to a heavy hand when it came to the cayenne pepper – I may have tripled it. Still, the soup was delicious as well as warming on a not-so-warm September evening.
Curried Squash and Mushroom Soup
From Katzen, M. Moosewood Cookbook. (1977). Berkeley, CA: Ten Speed Press, p. 14.
Ingredients
2 medium acorn or butternut squash
2 1/2 cups water or stock
1 cup orange juice
2 TBSP butter
1/2 cup chopped onion
1 medium clove garlic, crushed
6 oz. mushrooms, sliced
1/2 tsp ground cumin
1/2 tsp coriander
1/2 tsp cinnamon
3/4 tsp ground ginger
1/4 tsp dry mustard
1 1/4 tsp salt
a few dashes of cayenne
Optional: fresh lemon juice
Chopped toasted almonds & yogurt for finishing
Method
Split the squash lengthwise and bake face-down in a 375 degree oven on an oiled tray, 30 minutes or until soft. Cool and scoop out the insides. You need about 3 cups-worth. Put it in a blender with the water or stock and puree until smooth. Combine in a kettle or saucepan with the orange juice.
Heat the butter in a skillet and add the garlic, onion, salt and spices. Sauté until the onion is very soft. You may need to add a little water if it sticks. Add mushrooms, cover and cook 10 minutes.
Add the sauté to the squash, scraping the skillet well to salvage all the good stuff. Heat everything together very gently. Taste to correct seasonings. You may want more cayenne (I did) or salt. And, since this is a fairly sweet soup, you may want to spruce it up with some fresh-squeezed lemon juice.
Serve, topped with yogurt and chopped toasted almonds.
Note: This soup, unlike others in the Moosewood Cookbook, need not be served immediately. It can simmer a while and the flavors will mature.
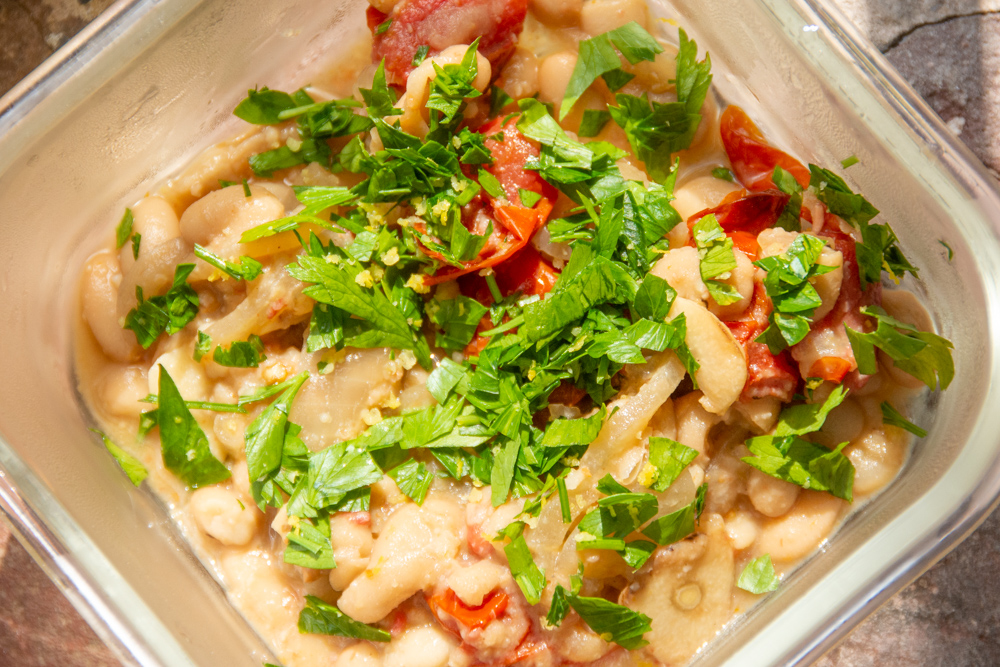
It’s not quite Autumn here in New England, but students are back to their school routines, the University is once again alive with students, and the leaves along the Merrimack River have begun to lose that summer green. Even though the temperatures are still in the 80s, it feels like Fall. And so, yesterday I made a vegetarian-vegan stew that would be very warming in colder weather.
½cup roughly chopped Italian parsley leaves and tender stems
2teaspoons lemon zest (from 1 large lemon)
2(10-ounce) containers cherry or grape tomatoes
¼cup olive oil, plus 2 tablespoons and more for drizzling (optional)
1tablespoon fresh thyme leaves
Kosher salt and black pepper
1medium yellow onion, thinly sliced
3large garlic cloves, thinly sliced
½teaspoon red-pepper flakes
2(15-ounce) cans white beans (such as butter or cannellini), rinsed
1 ½cups vegetable or chicken broth, or water
Flaky salt, for serving (optional)
Toasted bread, for serving
Method
Heat the oven to 425 degrees. In a small bowl, gently toss together the parsley and lemon zest with your hands until well combined; set aside.
In a large baking dish or on a sheet pan, toss the tomatoes with 1/4 cup oil and thyme; season well with salt and pepper. Roast tomatoes until they have collapsed and begin to turn golden around the edges, 20 to 25 minutes.
When the tomatoes are almost done roasting, heat 2 tablespoons oil in a large (12-inch), deep skillet or Dutch oven over medium. Add the onion, garlic and red-pepper flakes and cook until the onion is softened and the garlic is fragrant, 4 to 5 minutes. Stir in the rinsed beans and broth and bring to a simmer. With the back of a spoon or spatula (I used a potato masher), gently smash about ½ cup of the beans so they slightly thicken the broth. If you want a thicker stew, crush some more of the beans. Season with salt and pepper.
When the tomatoes are finished roasting, add them directly to the stew along with any juices that have been released. Simmer for 5 to 10 minutes more so the flavors become friendly; season to taste with salt.
Ladle into shallow bowls. Top each serving with some of the lemon-parsley mixture and drizzle with some more olive oil, and season with flaky salt, if you like. Serve with toasted bread.
For Noomers, this dish (1/6 recipe) is 252 calories.