• Vegan Potato Salad with Tahini from NYT’s Melissa Clark

    Melissa Clark is one of my favorite food writers at the New York Times. In fact, her book, Dinner in French, is one of my go-to’s for inspiration and French cuisine.

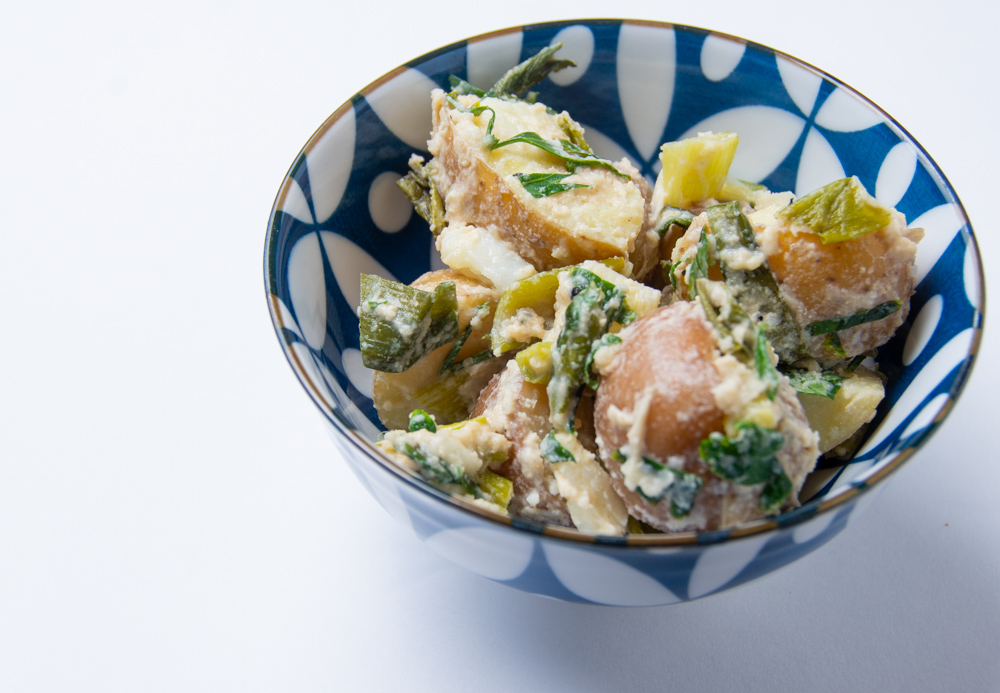
    With our granddaughter’s egg allergy, I am always looking for egg-free dishes that are delicious and appealing. This creamy potato salad, which we rolled out for our Independence Day lunch, was terrific – I’m sure no one missed the hard boiled eggs or mayonnaise.

    Ingredients

    • 1 ¾ pounds yellow potatoes, such as Yukon Gold, cut into 1-inch chunks (I used a mix of smaller potatoes and threw in some Yukon Golds left from a prior cooking experience)
    •  Salt and freshly ground black pepper
    • 2 bunches scallions, trimmed
    • ⅓ cup extra-virgin olive oil, plus more for drizzling
    • 2 tablespoons freshly squeezed lemon juice, plus more as needed
    • 1 to 2 garlic cloves, finely grated
    • 1 teaspoon ground cumin
    • ¼ cup tahini
    •  Ice water, as needed
    • ½ cup soft herbs, such as cilantro, parsley, mint, dill or a combination

    Method

    1. Place the potatoes in a large pot with enough salted water to cover by 1 inch. Bring to a boil over high heat and cook until potatoes are just tender, 10 to 15 minutes, depending on the kind of potato. Drain very well. (I did this step the day before and then rewarmed the potatoes before assembling)
    2. Heat the broiler. Arrange 1 bunch scallions on a sheet pan. Thinly slice the other bunch, reserving the slices for serving.
    3. Season the whole scallions in the pan with salt and pepper, and very lightly drizzle with olive oil. Broil until charred, tossing occasionally, for 3 to 7 minutes (keep your eye on these – my broiler needed only 3 minutes). Transfer to a cutting board to cool. Coarsely chop scallions and set aside.
    4. In a large bowl, whisk together lemon juice, garlic, cumin and a large pinch of salt. Let sit for 1 minute to mellow the garlic and dissolve the salt.
    5. Whisk in tahini, then gradually add ice water, 1 tablespoon at a time (about 3 to 6 tablespoons total), until the sauce thickens and is smooth enough to drizzle. The sauce can take 30 seconds to 1 minute to thicken so keep whisking; if it gets too thick, thin it down with a little more water. Taste and add more lemon juice and salt if needed.
    6. Transfer hot potatoes and charred scallions to bowl with tahini dressing. Drizzle in the remaining 1/3 cup olive oil and toss until potatoes are well coated. Taste and add more salt and lemon juice if needed.
    7. Let cool to room temperature for at least an hour before serving, or refrigerate for up to 24 hours. The potatoes will absorb the dressing as they sit.
    8. Just before serving, taste and add more salt or lemon juice if needed, and toss with the raw scallion slices and herbs.
  • Fizzy Watermelon Mocktail from allshecooks.com

    While I’m not a terrible home bartender, I’ve discovered that my mocktail game really needs some work.

    This morning I was in search of a refreshing mocktail that would offset the heat of Independence Day. And put to good use some of the very large watermelon that was taking up space in my fridge.

    This Fizzy Watermelon Mocktail comes from All She Cooks, a food, travel, and lifestyle blog. The website is full of great recipes including this one for a refresher that uses just 5 simple ingredients.

    Link to the Fizzy Watermelon mocktail here. And then take a look at some of the other offerings Nicole, the recipe creator and blogger has posted on her website, All She Cooks.

  • Chilled Cucumber-Yogurt Soup from Moosewood Cookbook

    On this 90-plus degree day, we turned to our cherished Moosewood Cookbook for a cool, refreshing, and light summer’s night dinner. Made early in the day, the soup had plenty of time to chill. It was also simple to pull together – add everything to a blender and blend.

    Chilled Cucumber-Yogurt Soup

    Recipe from Mollie Katzen’s Moosewood Cookbook

    Ingredients

    • 4 cups peeled, seeded, chopped cucumbers (this was about 2 1/2 good sized garden cukes for me)
    • 2 cups yogurt (I used 2% Greek yogurt from my local Greek grocery)
    • 1 clove garlic
    • Several fresh mint leaves
    • 1 TBSP honey
    • 1 1/2-2 tsp salt
    • 1/4 tsp dill weed
    • Chopped chives or scallions for garnish

    Method:

    Puree everything together in the blender (save the scallions/chives for garnish). Serve very cold.

  • With grocery roulette becoming more pronounced, I’ve been looking for some new salad ideas, particularly ones that don’t involve using lettuces.

    Hetty McKinnon, cookbook author and a food and recipe contributor to the New York Times, is the creative force behind this salad recently published in the New York Times. For more terrific food ideas and to become a subscriber to her veggie/salad based newsletter, click here.

    This broccoli salad was a hit in our house. Unfortunately, the week I decided we should try it was the week my food store’s broccoli looks pretty awful. Undeterred, I bought some frozen florets (2 bags is more than enough for this recipe), which I thawed ahead of time. Fresh broccoli will, of course, have way more crunch to it, so I’m looking forward to revisiting this recipe when our local farmstands have the real stuff.

    Broccoli Salad

    By Hetty McKinnon in the New York Times

    Ingredients

    FOR THE DRESSING:
    • ½ cup golden or black raisins or dried cranberries (I used dried unsweetened cranberries)
    • ½ red onion, finely sliced
    • ¼ cup apple cider vinegar
    • 4 teaspoons granulated sugar
    •  Kosher salt
    • 3 tablespoons extra-virgin olive oil
    • 1 tablespoon sesame oil
    FOR THE SALAD:
    • 1 ½ pounds broccoli-about 2 heads (I used frozen broccoli florets)
    • 1 apple (any variety), cored and cut into ½-inch cubes
    • 2 scallions, white and green parts, finely sliced
    •  Kosher salt and black pepper
    • ½ cup toasted sliced almonds, pepitas or sunflower seeds (I used sunflower)
    • 1 cup red or green grapes (optional), halved crosswise (IMHO, this was a great addition)

    Method:

    1. Make the dressing: Place raisins and red onion in a small bowl. Add vinegar, sugar, ¾ teaspoon salt and 2 tablespoons of water, and toss to combine. Leave to pickle for 10 minutes while you prepare the rest of the ingredients.
    2. Peel the woody exterior from the broccoli stalks and discard. Chop the stalks into ½-inch pieces. Chop the broccoli florets into ½-inch pieces. The pieces do not have to be uniform or the same shape. Place all the broccoli into a large mixing bowl.
    3. After 10 minutes, finish the dressing by adding the olive oil and sesame oil to the bowl with the pickling raisins and red onion, and stir well to combine. Taste and season with more salt if needed. It should be tangy, slightly sweet and a little salty.
    4. Add the raisin-and-onion dressing to the broccoli along with the apple and scallions. Using two large spoons, toss well so that everything is well coated. Season with 1/2 teaspoon salt and black pepper to taste. Taste to make sure you are happy with the seasonings, adding more if needed.
    5. When you are ready to eat, add the almonds (or nuts/seeds) and grapes (if using), and gently toss. Serve at room temperature.
  • Because today, May 18, is Adrien’s birthday, I decided to bake one of his favorite breakfast treats: scones.

    I really like this recipe from King Arthur Baking because it is a simple base from which to experiment. This morning, I added cinnamon bits and substituted maple syrup for the flavoring, but really, whatever the recipe accommodates any whims or cravings. By setting up the dry ingredients the night before, I had hot scones ready for breakfast in 30 minutes.

    Special birthdays definitely should start with breakfast.

    King Arthur Baking Simple Scones

    Ingredients

    Dough

    • 2 3/4 cups (326g) King Arthur Unbleached All-Purpose Flour or King Arthur Pastry Flour Blend
    • 1/3 cup (67g) granulated sugar
    • 3/4 teaspoon salt
    • 1 tablespoon (12g) baking powder
    • 8 tablespoons (113g) unsalted butter, cold
    • 1 cup to 2 cups (113g to 227g) chopped dried fruit, chocolate or other flavored chips, nuts, or a combination
    • 2 large eggs
    • 2 teaspoons vanilla extract, or flavoring of your choice
    • 3/4 cup (170g) half-and-half or milk

    Topping (optional)

    Method

    1. Preheat oven to 375°F. (Shaping options on the original recipe; however I lined a baking sheet with parchment, and pat the dough into a circle which is then segmented into eighths)
    2. In a large mixing bowl, whisk together all the dry ingredients.
    3. Cut in the butter just until the mixture is unevenly crumbly; it’s OK for some larger chunks of butter to remain unincorporated.
    4. Stir in the fruit, chips, and/or nuts.
    5. In a separate mixing bowl, whisk together the eggs, vanilla or other flavor, and half-and-half or milk. Add the liquid ingredients to the dry ingredients and stir until all is moistened and holds together.
    6. Using a muffin scoop or a 1/3-cup measure, generously filled, fill your scone pan or baking cups. Or plop the dough in mounds onto the baking sheet. Brush with a bit of milk and top with coarse sparkling sugar. (see step one for my adaptation)
    7. Bake the scones 25 minutes to 30 minutes until lightly browned. Remove them from the oven and let them sit for 4 to 5 minutes to firm before removing them from the pan.
    8. Serve scones warm with butter and/or jam.
  • We hosted family for a casual lunch on Mothers’ Day this year. When picking out what to cook for our family get-togethers, there’s a lot to think about when considering the guests range in age from 3 to 98.

    This simple and versatile recipe comes from Karie Houghton via Taste of Home website. It was simple to prep and, being a slow-cooker recipe, even easier to cook. We served it with a green lettuce and tomato salad (scallions, avocado and dressing on the side) and with sandwich buns for those who preferred sandwiches over salad.

    Definitely a keeper for family gatherings. Use the recipe’s link for nutrition information.

    Slow Cooker Chicken Taco Salad

    Karie Houghton (Lynnwood, WA) on Taste of Home

    Ingredients

    • 3 tsp chili powder
    • 1 tsp each ground cumin, seasoned salt and pepper (I used Kosher salt)
    • 1/2 tsp each white pepper, ground chipotle pepper and paprika
    • 1/4 tsp dried oregano
    • 1/4 tsp crushed red pepper flakes
    • 1-1/2 pounds boneless skinless chicken breasts
    • 1 C chicken broth
    • 9 C torn romaine (I used a mix of green leaf and baby romaine)
    • Optional toppings: Sliced avocado, shredded cheddar cheese, chopped tomato or halved cherry tomatoes, sliced green onions and salad dressing of your choice

    Method

    1. Mix seasonings
    2. Rub over chicken. Place in a 3-qt. slow cooker.
    3. Add broth. Cook, covered, on low until chicken is tender, 3-4 hours.
    4. Remove chicken; cool slightly. (This was done the day before serving, refrigerated, and then warmed slightly – keep a bit of the liquid from cooking so the chicken stays moist)
    5. Shred with 2 forks. Serve over romaine; top as desired. (I also served on sandwich buns with the accompaniments)
  • Sometimes I feel like I don’t make enough use of my Instant Pot. However, whenever we make a bean-based dish calling for dried beans, I absolutely know that going back to the “old ways” of prepping dried beans has been made infinitely more easy since Instant Pots and pressure cooking came back into vogue.

    This meal has some prep to it, as well as a somewhat long list of ingredients. I dislike dried garlic powder and dried onion powder so a) I never have them in the pantry and b) I never use them. However, if you feel inclined, I’ve included the original recipe’s ingredient list which does list them. Cook the rice about 10 minutes before the pressure-cooker cycle is completed and it should be just about perfect as you are releasing the Instant Pot’s pressure manually (cooking time about 20-25 min).

    A Louisiana-style hot sauce is a key to the “Monday Red Beans” dish reminiscent of New Orleans. Luckily for us, we have a local purveyor, Craic Sauce, whose Mill City Red is the perfect addition to this dish. Check them out if you live here in New England, or order from their web site here.

    Vegan Pressure Cooker Red Beans and Rice

    Sarah DiGregorio in the New York Times

    Ingredients

    • ¼ cup vegetable oil
    • 1 large yellow onion, finely chopped
    •  Kosher salt and black pepper
    • 3 celery stalks, finely chopped
    • 1 green bell pepper, finely chopped
    • 10 garlic cloves, finely chopped
    • 1 heaping tablespoon white or yellow miso paste
    • 2 teaspoons smoked paprika
    • 1 teaspoon sweet paprika
    • 1 teaspoon onion powder (I did not use this)
    • 1 teaspoon garlic powder (I did not use this)
    • ½ to 1 teaspoon ground cayenne, plus more to taste
    • ½ teaspoon ground sage (optional)
    • 1 pound dried red kidney beans (no need to soak)
    • 3 dried bay leaves
    • 3 fresh thyme sprigs or 1 teaspoon dried thyme
    • 1 teaspoon soy sauce
    •  Cooked rice, for serving
    •  Sliced scallions, for serving
    •  Louisiana-style hot sauce, for serving

    Method

    1. Turn on the sauté setting of a 6- to 8-quart electric pressure cooker and heat the oil.
    2. Add the onion, season with salt, and cook, stirring occasionally, until limp and translucent, 6 to 8 minutes.
    3. Add the celery and bell pepper, and cook, stirring occasionally, until softened, 5 to 8 minutes.
    4. Add the chopped garlic, miso paste, smoked paprika, sweet paprika, onion powder, garlic powder, cayenne and sage (if using). Grind in a generous amount of black pepper and add 3/4 teaspoon salt. Stir well to combine all the ingredients, then turn off the sauté setting.
    5. Add the beans, bay leaves, thyme and 5 1/2 cups water. Scrape the bottom of the pot to loosen any browned bits. Cook on high pressure until the beans are creamy, 50 minutes to 1 hour.
    6. Turn off the pressure cooker and allow the pressure to reduce naturally for 10 minutes, then release the remaining pressure manually and open the lid.
    7. Add the soy sauce, and season to taste with salt and cayenne. Using a fork, mash some of the beans against the side of the pressure cooker to make the mixture creamy. It will continue to thicken as it sits, or you can turn on the sauté setting and let the mixture bubble for a few minutes to thicken.
    8. Discard the bay leaves and thyme sprigs. Top the beans with hot cooked rice and scallions; serve with hot sauce.
  • This soup was very satisfying – not vegetarian, but could easily adapted to be so. The combination of mashed and whole chickpeas made for an interesting texture. I personally would substitute something less salty for the chicken broth (wine?) and I would never use garlic powder.

    The portion sizes must be huge! I made a half-recipe and still had about 4 servings.

    Hearty Chickpea and Spinach Stew

    Recipe from Patsy Jamieson, Diabetic Living (Spring 2019). Downloaded from Eating Well Magazine

    Ingredients (Full Recipe as published)

    • 2 (15 ounce) cans low-sodium chickpeas, rinsed, divided 
    • 1 tablespoon olive oil 
    • 12 ounces 93%-lean ground turkey 
    • ½ teaspoon dried oregano 
    • ½ teaspoon fennel seeds, crushed 
    • ½ teaspoon crushed red pepper 
    • 1 medium onion, chopped (1 cup) 
    • 2 medium carrots, diced (3/4 cup) 
    • 4 cloves garlic, minced, or 1/2 teaspoon garlic powder 
    • 3 tablespoons tomato paste 
    • 1 (32 ounce) carton low-sodium chicken broth (4 cups) 
    • ¼ teaspoon ground pepper 
    • ⅛ teaspoon salt 
    • 3 cups IQF (individually quick-frozen) spinach (8 oz.) 
    • ¼ cup grated Parmesan cheese (Optional)

    Method

    1. Mash 1 can chickpeas with a potato masher or fork. Set aside.
    2. Heat oil in a large pot over medium-high heat. Add turkey, oregano, fennel seeds, and crushed red pepper; cook, crumbling with a wooden spoon, until the turkey is no longer pink, 2 to 3 minutes. Add onion, carrots, and garlic (or garlic powder); cook, stirring often, until softened and fragrant, 3 to 4 minutes. Add tomato paste; cook, stirring, for 30 seconds.
    3. Add broth, the mashed and whole chickpeas, pepper, and salt to the pot. Cover and bring to a simmer. Reduce heat to medium and cook, covered, at a brisk simmer until the vegetables are tender and the flavors have blended, about 10 minutes.
    4. Add spinach* and increase heat to medium-high, Cook, stirring, until the spinach is heated through, 1 to 2 minutes. Ladle the soup into bowls. Garnish each serving with 1 Tbsp. Parmesan, if desired.
    • * if using frozen spinach, go ahead and add to the mix in step 3.
  • We don’t consume much meat or poultry any more, but when I do, I live by the mantra “a little goes a long way”. So this recipe for Chicken Piccata from Whole Foods Market was light on the chicken and the serving sizes were much smaller.

    The chicken meat was pounded with a rolling pin between 2 pieces of wax paper until they were about 1/4 thick. This allows for quick a sauté and, in my opinion, makes smaller serving sizes completely reasonable. I also threw in an equivalent amount of white wine in place of the chicken broth which I thought didn’t harm the taste at all.

    Whole Foods Market Chicken Piccata

    Ingredients

    • 4 skinless, boneless chicken cutlets (about 1 1/4 lbs)
    • 1 lemon, zested and juiced
    • 1/2 cup all-purpose flour
    • 1/2 tsp fine sea salt
    • 1/2 tsp ground black pepper
    • 2 TBSP olive oil
    • 1/3 cup drained capers
    • 1/2 cup dry white wine
    • 3/4 cup low-sodium chicken broth
    • 2 TBSP chopped fresh parsley

    Method

    1. Place chicken cutlets between 2 sheets (parchment or waxed paper preferred over plastic wrap). With a mallet or rolling pin, gently pound cutlets to an even 1/4-inch thickness.
    2. In a shallow bowl or pie plate, combine flour, lemon zest, salt and pepper. Dip chicken in flour, coat all sides and shake off excess.
    3. Preheat a large skillet over medium-high heat.
    4. Carefully place chicken in hot oil and cook until browned and cooked through – about 3 minutes per side. Transfer chicken to a clean place and cover to keep warm.
    5. Add capers to pan and cook for 1 minute until browned on edges and slightly plumped. Add wine and chicken broth and bring to a brisk simmer, stirring with a wooden spoon to scrape up browned bits from the bottom of the pan.
    6. Cook until liquid is reduced by half, 3 to 4 minutes.
    7. Remove pan from heat and stir in parley and 2 TBSP of the lemon juice. Taste and adjust seasonings with salt, pepper and lemon juice.
    8. Divide chicken among plates , top with capers and drizzle with sauce.
  • One of the rewards of reading David Lebovitz’s Sweet Life in Paris was discovering some of his favorite recipes interspersed among entertaining story-telling of adapting to Paris and French culture. This recipe is one of my favorites – you can find David’s original blog post here – definitely a must-read.

    For this, my second-ever batch of madeleines, I followed the recipe exactly. The key to success – in my humble amateur-baker opinion – is to pop the madeleine tray into the freezer while the oven heats up. Keeping the batter and the madeleine mold super cold resulted in perfectly shaped madeleines. My other cautionary advice is know your oven. Mine is a little quirky, i.e., it runs hot, which I discovered as I turned the first batch of 12 out of the pan at 8 minutes. The second batch which meant I needed a good cool-down of pan and batter after the first batch of 12 – came out more madeleine-like at 7 minutes. So noted.

    I’ve recently begun using volume measurements for baking and followed the amounts given for grams in the recipe.This recipe yields 24 madeleine, so be sure to either have 2 pans or be prepared to do a little juggling in between batches.

    Also note David’s suggestion regarding storing unless you’ve got plans for all 24 pretty soon after baking.

    If you’re a fan of Proust, these lovely French treats will help pass the time spent reading the longest novel known to humankind. But if you just want to enjoy a treat that can transport you back to Paris – that works too.

    David Lebovitz’s Lemon-Glazed Madeleine

    Ingredients

    • 3 large eggs, at room temperature
    • 2/3 cup (130g) granulated sugar
    • rounded 1/8 teaspoon salt
    • 1 1/4 cup (175g) flour
    • 1 teaspoon baking powder, (optional)
    • zest of one small lemon
    • 9 tablespoons (120g) unsalted butter, melted and cooled to room temperature, plus additional melted butter for preparing the molds
    • 3/4 cup (150g) powdered sugar
    • 1 tablespoon freshly-squeezed lemon juice
    • 2 tablespoons water

    Method

    1. Brush the indentations of a madeleine mold with melted butter. (I melted the butter as I was assembling the ingredients for baking – doing so meant the butter was cooled down when needed) Dust with flour, tap off any excess, and place in the fridge or freezer. (I used the freezer)
    2. In the bowl of a standing electric mixer, whip the eggs, granulated sugar, and salt for 5 minutes until frothy and thickened. (no shortcutting – set a timer)
    3. Spoon the flour and baking powder, if using, into a sifter or mesh strainer and use a spatula to fold in the flour as you sift it over the batter.
    4. Add the lemon zest to the cooled butter, then dribble the butter into the batter, a few spoonfuls at a time, while simultaneously folding to incorporate the butter. Fold just until all the butter is incorporated.
    5. Cover the bowl and refrigerate for at least 1 hour. (Batter can be chilled for up to 12 hours.)
    6. To bake the madeleines, preheat the oven to 425 degrees.
    7. Plop enough batter in the center of each indentation with enough batter (remember, this makes 24, which may help with eyeballing the amount of batter) which you think will fill it by 3/4’s (you’ll have to eyeball it, but it’s not brain-surgery so don’t worry if you’re not exact.) Do not spread it.
    8. Bake for 8-9 minutes or until the cakes just feel set. While the cakes are baking, make a glaze in a small mixing bowl by stirring together the powdered sugar, lemon juice, and water until smooth.
    9. Remove from the oven and tilt the madeleines out onto a cooling rack. The moment they’re cool enough to handle, dip each cake in the glaze, turning them over to make sure both sides are coated and scrape off any excess with a dull knife. After dipping, rest each one back on the cooking rack, scalloped side up, until the cakes are cool and the glaze has firmed up.