• We don’t consume much meat or poultry any more, but when I do, I live by the mantra “a little goes a long way”. So this recipe for Chicken Piccata from Whole Foods Market was light on the chicken and the serving sizes were much smaller.

    The chicken meat was pounded with a rolling pin between 2 pieces of wax paper until they were about 1/4 thick. This allows for quick a sauté and, in my opinion, makes smaller serving sizes completely reasonable. I also threw in an equivalent amount of white wine in place of the chicken broth which I thought didn’t harm the taste at all.

    Whole Foods Market Chicken Piccata

    Ingredients

    • 4 skinless, boneless chicken cutlets (about 1 1/4 lbs)
    • 1 lemon, zested and juiced
    • 1/2 cup all-purpose flour
    • 1/2 tsp fine sea salt
    • 1/2 tsp ground black pepper
    • 2 TBSP olive oil
    • 1/3 cup drained capers
    • 1/2 cup dry white wine
    • 3/4 cup low-sodium chicken broth
    • 2 TBSP chopped fresh parsley

    Method

    1. Place chicken cutlets between 2 sheets (parchment or waxed paper preferred over plastic wrap). With a mallet or rolling pin, gently pound cutlets to an even 1/4-inch thickness.
    2. In a shallow bowl or pie plate, combine flour, lemon zest, salt and pepper. Dip chicken in flour, coat all sides and shake off excess.
    3. Preheat a large skillet over medium-high heat.
    4. Carefully place chicken in hot oil and cook until browned and cooked through – about 3 minutes per side. Transfer chicken to a clean place and cover to keep warm.
    5. Add capers to pan and cook for 1 minute until browned on edges and slightly plumped. Add wine and chicken broth and bring to a brisk simmer, stirring with a wooden spoon to scrape up browned bits from the bottom of the pan.
    6. Cook until liquid is reduced by half, 3 to 4 minutes.
    7. Remove pan from heat and stir in parley and 2 TBSP of the lemon juice. Taste and adjust seasonings with salt, pepper and lemon juice.
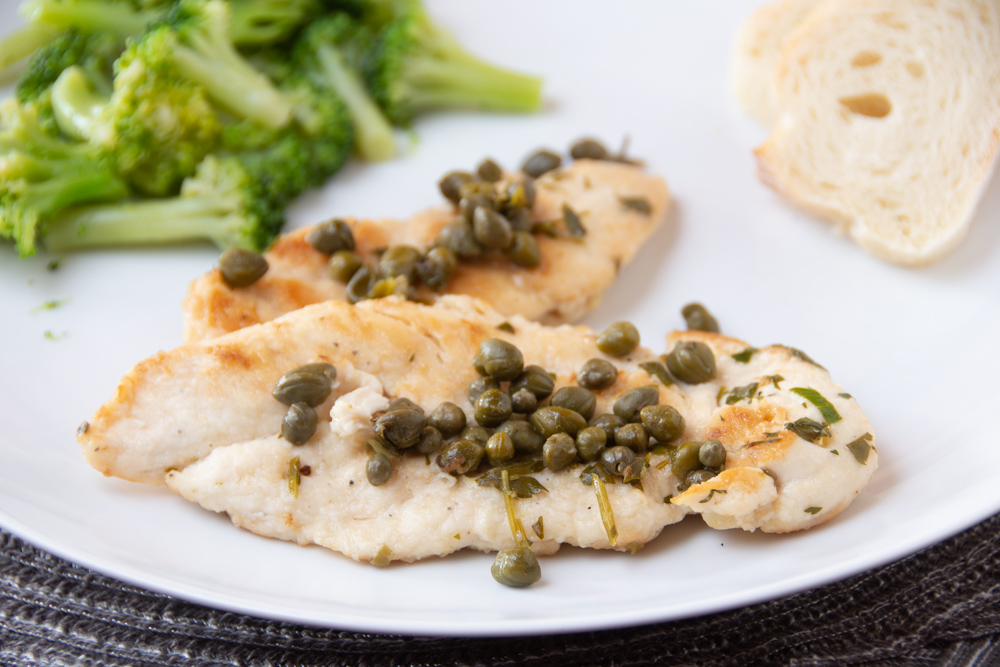
    8. Divide chicken among plates , top with capers and drizzle with sauce.
  • One of the rewards of reading David Lebovitz’s Sweet Life in Paris was discovering some of his favorite recipes interspersed among entertaining story-telling of adapting to Paris and French culture. This recipe is one of my favorites – you can find David’s original blog post here – definitely a must-read.

    For this, my second-ever batch of madeleines, I followed the recipe exactly. The key to success – in my humble amateur-baker opinion – is to pop the madeleine tray into the freezer while the oven heats up. Keeping the batter and the madeleine mold super cold resulted in perfectly shaped madeleines. My other cautionary advice is know your oven. Mine is a little quirky, i.e., it runs hot, which I discovered as I turned the first batch of 12 out of the pan at 8 minutes. The second batch which meant I needed a good cool-down of pan and batter after the first batch of 12 – came out more madeleine-like at 7 minutes. So noted.

    I’ve recently begun using volume measurements for baking and followed the amounts given for grams in the recipe.This recipe yields 24 madeleine, so be sure to either have 2 pans or be prepared to do a little juggling in between batches.

    Also note David’s suggestion regarding storing unless you’ve got plans for all 24 pretty soon after baking.

    If you’re a fan of Proust, these lovely French treats will help pass the time spent reading the longest novel known to humankind. But if you just want to enjoy a treat that can transport you back to Paris – that works too.

    David Lebovitz’s Lemon-Glazed Madeleine

    Ingredients

    • 3 large eggs, at room temperature
    • 2/3 cup (130g) granulated sugar
    • rounded 1/8 teaspoon salt
    • 1 1/4 cup (175g) flour
    • 1 teaspoon baking powder, (optional)
    • zest of one small lemon
    • 9 tablespoons (120g) unsalted butter, melted and cooled to room temperature, plus additional melted butter for preparing the molds
    • 3/4 cup (150g) powdered sugar
    • 1 tablespoon freshly-squeezed lemon juice
    • 2 tablespoons water

    Method

    1. Brush the indentations of a madeleine mold with melted butter. (I melted the butter as I was assembling the ingredients for baking – doing so meant the butter was cooled down when needed) Dust with flour, tap off any excess, and place in the fridge or freezer. (I used the freezer)
    2. In the bowl of a standing electric mixer, whip the eggs, granulated sugar, and salt for 5 minutes until frothy and thickened. (no shortcutting – set a timer)
    3. Spoon the flour and baking powder, if using, into a sifter or mesh strainer and use a spatula to fold in the flour as you sift it over the batter.
    4. Add the lemon zest to the cooled butter, then dribble the butter into the batter, a few spoonfuls at a time, while simultaneously folding to incorporate the butter. Fold just until all the butter is incorporated.
    5. Cover the bowl and refrigerate for at least 1 hour. (Batter can be chilled for up to 12 hours.)
    6. To bake the madeleines, preheat the oven to 425 degrees.
    7. Plop enough batter in the center of each indentation with enough batter (remember, this makes 24, which may help with eyeballing the amount of batter) which you think will fill it by 3/4’s (you’ll have to eyeball it, but it’s not brain-surgery so don’t worry if you’re not exact.) Do not spread it.
    8. Bake for 8-9 minutes or until the cakes just feel set. While the cakes are baking, make a glaze in a small mixing bowl by stirring together the powdered sugar, lemon juice, and water until smooth.
    9. Remove from the oven and tilt the madeleines out onto a cooling rack. The moment they’re cool enough to handle, dip each cake in the glaze, turning them over to make sure both sides are coated and scrape off any excess with a dull knife. After dipping, rest each one back on the cooking rack, scalloped side up, until the cakes are cool and the glaze has firmed up.
  • This was a delightful soup – hot or cold. Night One we ate it just as it finished cooking with a dollop of Greek yogurt, lime, and some basil. The next day, I took Dorie Greenspan at her word that the soup was good hot or cold and ate leftovers straight from the fridge. Both ways were delicious!

    A combination of leeks, shallots, garlic, zucchini, asparagus, and basil, the soup needed no other seasoning than a bit of salt and pepper.

    The recipe comes from Dorie Greenspan’s Everyday Dorie, which has become one of my regular go-to’s for weekly recipe ideas (purchasing details are here).

  • Recently, I finished reading David Lebovitz’s book, The Sweet Life in Paris, which tells about his move to Paris and coming to terms with the cultural differences between his newly adopted home in Paris and San Francisco where he lived and worked. More than just a relocation, moving to Paris, or any other location really, involves some cultural shifts. David’s retelling of adapting to new ways not only triggered memories of our short-term travel to Paris, but also serves as a reminder that personal growth can sometimes be uncomfortable. And funny.

    David included some outstanding favorite recipes in his book. This one, Dulce de Leche Brownies, was one of the last shared and it was, in my opinion, a winning way to close out this narrative.

    I’ve left the weight measurements in the recipe as those produce a more consistent result.

    Dulce de Leche Brownies

    David Lebovitz

    Ingredients

    • 8 tablespoons (115g) salted or unsalted butter, cut into pieces
    • 6 ounces (170g) bittersweet or semisweet chocolate, finely chopped
    • 1/4 cup (25g) unsweetened cocoa powder, preferably Dutch-process
    • 3 large eggs, at room temperature
    • 1 cup (200g) sugar
    • 1 teaspoon vanilla extract
    • 1 cup (140g) flour
    • optional: 1 cup (100g) toasted pecans or walnuts, coarsely chopped
    • 1 cup (260g) Dulce de leche (David Lebovitz share’s his own recipe (linked), but I wimped out here and used a commercial version that I had in the pantry)

    Method

    1. Preheat the oven to 350ºF degrees (175 C.)
    2. Line an 8-inch (20 cm) square pan with a long sheet of aluminum foil that covers the bottom and reaches up the sides. If it doesn’t reach all the way up and over all four sides, cross another sheet of foil over it, making a large cross with edges that overhang the sides. Grease the bottom and sides of the foil with some softened butter or non-stick spray.
    3. Melt the butter in a medium saucepan. Add the chocolate and stir constantly over very low heat until the chocolate is melted. Remove from heat and whisk in the cocoa powder until smooth. Add in the eggs one at a time, then stir in the sugar, vanilla, then the flour. Mix in the nuts, if using.
    4. Scrape half of the batter into the prepared pan. Drop one-third of the dulce de leche by scant tablespoons evenly spaced over the brownie batter. Either drag a butter knife through the dulce de leche mounds to swirl them very slightly, being careful not to overdo it, or leave the mounds as they are. Spread the remaining brownie batter over, then drop spoonfuls of the remaining dulce de Leche in dollops over the top of the brownie batter. Use a knife to swirl the dulce de Leche slightly.
    5. Bake until the center feels just-slightly firm, but still jiggly, about 30 minutes, but check them at the 25-minute mark as different chocolates behave differently and with these brownies, as with most brownies, you want to catch them before they become overbaked. Remove from the oven and cool completely. Once cool, lift the brownies out of the pan by grabbing the edges of the foil to remove them from the pan. 
  • I was fortunate to stay at Kripalu Center for Yoga and Health a few years ago. Along with the inspirational yoga, Kripalu has a wonderful and well-earned reputation for deliciously healthy and healing foods. This delicious soup from Chef Jeremy Rock Smith is bright with lemon and dill and not at all heavy. Highly recommended: Chef Smith’s Kripalu Kitchen cookbook which is filled with healthy recipes that will satisfy hunger as well as your soul.

    Lemony Carrot Soup with Fennel Relish

    Chef Jeremy Rock Smith, Kripalu Executive Chef

    Ingredients

    • 3 cups finely chopped carrots (I used the food processor to get these chopped finely)
    • 1/2 cup minced onion
    • 2 TBSP finely chopped fennel
    • 1 1/2 TBSP EV Olive Oil
    • 1/4 tsp group fennel seed (I used a mortar & pestle to pulverize the whole seeds)
    • 4 cups vegetable stock
    • 3 TBSP fresh lemon juice
    • 2 tsp fresh dill, chopped
    • 1/2 tsp sea salt
    • 1/4 tsp freshly ground black pepper

    Fennel Relish Ingredients

    • 1 cup shaved fennel (from 1 small bulb)
    • 2 tsp fresh lemon juice
    • 1/2 tsp grated lemon zest
    • 1 TBSP olive oil
    • 1/4 tsp sea salt
    • Pinch freshly ground black pepper

    Method

    I prepared the relish first so it had time to macerate:

    Fennel Relish: Combine everything is a small bowl. Let macerate at room temperature for about 20 minutes to blend the flavors.

    For the soup:

    1. Heat a medium soup pot over low heat. Put in the carrots, onions, fennel and oil, shaking the pot to coat the vegetables. Cover and sweat gently until the carrots are almost tender (8-10 minutes).
    2. Uncover and stir in the ground fennel seed. Raise the heat to medium and cook until the spice is fragrant (2-3 minutes). Add the stock and bring to a boil over high heat, then reduce the heat to medium low and simmer gently until the flavors blend and the carrots are very tender (8-10 minutes).
    3. Puree the soup until smooth with an immersion blend (or use a regular blender – I alway tend toward the immersion).
    4. If using the regular blender take care to avoid a blowout by slightly cooling the soup and leaving the center lid off the top of the blender. Return soup to the pot.
    5. Stir in the lemon juice, dill, salt and pepper. Serve hot with the relish as desired.
  • It’s Monday and time for the #Moosewood2022 challenge! This recipe comes right from the original Moosewood Cookbook, one we purchased in 1978.

    This was surprisingly filling, and unsurprisingly, delicious. I’ll admit to taking a shortcut with the butternut squash though as our local grocer did not have any butternut squash this week. I used a bag of quick-frozen squash, which is a timesaver of course, but less tasty than if I had started by roasting my own vegetable. Also, frozen squash, even when defrosted slowly, has a lot of water that needs to be poured off. Next time, I’ll hold out for the real thing.

    I served the squash with Mill City Red, a local hot sauce created by Brian Ruhlman of Craic Sauce. If you’re not fortunate enough to live locally in Lowell, Massachusetts, you can find this sauce online here.

    Arabian Squash-Cheese Casserole

    Mollie Katzen, Moosewood Cookbook

    Ingredients

    • 2 medium-large butternut or acorn squash
    • 1 heaping c chopped onion
    • 2-3 cloves crushed garlic
    • 1 heaping c mixed green and red peppers, chopped
    • 3 TBSP butter for sauté (I used coconut oil)
    • 1 tsp salt
    • 2 beaten eggs
    • 1 c buttermilk or yogurt (I used 0% yogurt)
    • 1/2 c crumbled feta cheese
    • black & red pepper to taste
    • 1/4 c sunflower seeds or chopped nuts for the top) (I used walnuts)

    Method

    1. Cut the squash down the middle lengthwise. Scoop out the seeds, and place it face-down on an oiled tray. Bake it at 375 degrees about 35 minutes, or until soft. Cool until handle-able; scoop out and mash.
    2. Sauté the onion and garlic, lightly salted, in butter. When the onion is translucent, add the chopped peppers. Sauté until the peppers are just under-done.
    3. Beat eggs with buttermilk or yogurt. Crumble in the feta cheese. Combine everything and mix well. Add salt, black pepper and red pepper or hot sauce (I held the hot sauce until serving).
    4. Spread into a butter casserole or baking pan. Top with seeds or nuts.
    5. Bake at 375 degrees F – covered for 25 minutes, then uncovered for 10 minutes.

  • For my birthday this year, Adrien gifted me with 2 Sur La Table online cooking classes, and they’ve been terrific. Not only have we had some really wonderful meals, but I’ve learned a lot from the Chef at each demonstration and cook-along. Beside the reasonable cost ($29/class which allows for household to be online) the best part is enjoying and learning through cooking.

    Last night, we cooked a wonderful wine-themed meal together: Seared Scallops with Prosecco Butter Sauce, Chardonnay, Pecorino and Pea Risotto, and these decadently delicious Prosecco Chocolate Truffles.

    Absolutely recommend these online classes to anyone as a great way to perk up cooking repertoires, get some great chef pointers for managing timing and prepping/cooking, and spend some quality time with your S.O. Such fun cooking with people from all over the country!

    Prosecco Chocolate Truffles

    Ingredients:

    • 8 oz semi sweet Valrhona chocolate cut into small pieces
    • 2 oz (2 TBSP) unsalted butter cut into small pieces
    • 2 oz (1/4 C) heavy whipping cream
    • 1/4 tsp fine kosher salt
    • 3 TBSP Prosecco or sparkling white wine
    • 3-4 TBSP cocoa powder, sifted

    Method:

    1. Lightly butter and 8-inch loaf pan and line it with parchment paper, leaving a few inches of overhang on the sides. The butter will help the parchment paper stick to the pan without slipping.
    2. To prepare the chocolate: Combine the chocolate, butter, cream and a pinch of salt in a heatproof bowl and set it over a pan of simmering water. Make sure the water does not touch the bottom of the bowl. Stir the mixture over the heat until just melted and smooth. Remove from the heat and whisk in the Prosecco.
    3. To chill the chocolate block: Transfer the chocolate into the prepared loaf pan with a spatula and smooth the surface. Chill in the refrigerator for at least 8 hours or up to 24 hours until set firmly (there will still be some slight give, which is good) or freeze 1 hour until firm.
    4. To slice the truffles: Warm a knife in hot water, dry it off and then run it around the rim of the pan to loosen the chocolate block. Lift out the block using the parchment sling. Trim the end of the truffle to square them off if you want.
    5. Cut the block in half through the middle to make two squares. Cut each square into thirds and then cut into fourths to make cubes. Wipe down your knife to prevent sticking, dip again in warm water and wipe dry.
    6. To coat the truffles with cocoa: Place the sifted cocoa powder in a bowl. Carefully toss each cube in cocoa powder.
    7. Serving and storing: If serving the same day, arrange the truffles on a plate and store in fridge until serving. Take them out of the fridge a little bit before serving to take the chill off. Truffles can be stored in an airtight container (in the refrigerator) for up to 3 days.
  • You know you’re in for something special when the head note on a recipe starts out like this

    There are two kinds of people in this world: people who like enchiladas and people who have no f-ing* taste. Which are you?

    a) *sorry Mom and b) Thug Kitchen (now Bad Manners), the Official Cookbook (2014). New York: Rodale Press.

    I’ve had more fun cooking from Thug Kitchen, now known as Bad Manners. Tasty, vegetarian, vegan, creative…. and fresh in every sense of the word. Expect that shit is just about to get real.

    This is one of our favorites from the original. I could never do it justice by simply reprinting the recipe, so here’s the link right to Bad Manners website.

    Sweet Potato, Squash, and Black Bean Enchiladas

    Better yet, buy the book, subscribe to the newsletter and for the love of all things holy, listen to the podcast.

  • I hear there’s some kind of football game going on tonight, and that quite a few spectators will be consuming chili. For those of us who don’t watch a lot of football, with snow in the air (again), it feels like a good dish for warming up.

    Skinny Taste‘s recipe called for black beans (makes sense as that’s part of the name of this recipe). However, I used the recipe as a base for opening up my canned goods store and using some of the stockpile that was getting close to the expiration date. That meant that in place of a diced jalepeno, which I didn’t have on hand, I used a can that had been taking up space for a number of months. Likewise, when I found I was a 15-oz. can short of black beans, I substituted a can of cannellini beans. What I found was this recipe is very forgiving and can be adjusted for what’s on hand.

    And that, after all, is how we cook these days, at least in this house. With supply shortages and increases in prices, we are finding more and more that our weekly food plan is partially planned out and partially ready for improvisation. This is one recipe that lends itself to doing just that.

    Easy Black Bean Vegetarian Chili with Spiced Yogurt

    Recipe from Skinny Taste

    Ingredients

    Spice Mix:

    • 1 1/4 TBSP cumin
    • 1 1/4 TBSP chili powder
    • 1/4 TBSP garlic powder
    • 1/4 tsp onion powder
    • 1/2 tsp smoked paprika
    • 1 tsp kosher salt

    Chili:

    • 3/4 C Stonyfield Organic whole milk plain yogurt (I used up some plan 0% Greek yogurt – just stir vigorously)
    • 2 15-oz cans black beans (I needed to substitute 1 of the black bean cans; used cannellini beans)
    • 1 TBSP olive oil
    • 1 medium onion, chopped
    • 1 red bell pepper, chopped
    • 1 diced jalapeno, plus more for garnish (I used a can of chopped jalepenos)
    • 10 oz can rotel tomatoes with green chilies
    • 8 ounces frozen corn
    • 8 ounce can tomato sauce
    • 3/4 cup less-sodium vegetable broth
    • Optional Toppings: shredded cheddar, diced red onions, cilantro, diced avocado

    Method

    1. Mix the spices in a small bowl. Set aside 1 1/2 teaspoons and mix into the yogurt. Set aside.
    2. Place 1 can of beans, not drained in the blender with 1/2 cup of water and puree. (I used the cannellini beans for the blended can)
    3. Drain the second can of beans.
    4. Add oil to a large pot over medium heat, add the onions, bell pepper and jalapeno and cook 3 to 4 minutes.
    5. Add tomatoes, corn, beans, pureed beans, tomato sauce, vegetable broth and remaining spices.
    6. Bring to a boil, cover and simmer about 15 minutes, stirring until thickened.
    7. Serve topped with spiced yogurt plus your favorite optional toppings.

    Noomers: (Serves 6) 264 Cals, 14.5 Protein, 44.5 Carbs, 4.5 Fats

  • Both of us find carrot soup delicious and comforting, so I’m often drawn to those recipes when looking for a quick dinner based on soup. Apparently, I am not alone in my love of carrot soup as Mollie Katzen has a Moosewood and an Enchanted Broccoli Forrest version.

    When we downsized from our house to a condo, I also needed to downsize my collection of cookbooks. I sent my copy of Enchanted Broccoli Forrest off to a friend, keeping my beloved Moosewood cookbook. Making the discovery that Mollie Katzen has published some of Enchanted Broccoli’s recipes on her website was a delightful one!

    As she points out, this version of Gingered Carrot Soup is deliciously thick and can be used as a sauce if so desired. We however, ate it straight up (I skipped the buttermilk) and found it warming and bright (thank you lemon juice).

    Gingered Carrot Soup

    Mollie Katzen, Enchanted Broccoli Forrest

    Ingredients

    • 2 lbs. carrots
    • 4 cups water
    • 1 TBSP butter or oil (I used coconut oil)
    • 1 1/2 c chopped onion
    • 2 med. cloves garlic, minced
    • 2 TBSP freshly grated ginger
    • 1 1/2 tsp salt
    • 1/4 tsp EACH: cumin, ground fennel, cinnamon, allspice, dried mint (I had some fresh, so used that)
    • 3-4 TBSP fresh lemon juice
    • 1 cup lightly toasted cashews
    • OPTIONAL: buttermilk to drizzle on top

    Method

    1. Peel and trim carrots, and cut them into 1-inch chunks. Place in a medium-large saucepan with the water. Cover and bring to a boil. Lower the heat and simmer until very tender (about 10-15 minutes, depending upon the size of the carrot pieces).
    2. Meanwhile, heat the butter or oil in a small skillet. Add onions and sauté over medium heat for about 5 minutes. Add garlic, ginger, salt, and spices. Turn heat to low, and continue to sauté for another 8 to 10 minutes, or until everything is well mingled and the onions are very soft. Stir in lemon juice.
    3. Use a food processor or blender to purée everything together – including the toasted cashews. (I used my immersion blender for this – not a fan of my food processor or countertop blender). You will need to do this in several batches if using food processor or countertop blender.
    4. Transfer the purée to a kettle and heat gently just before serving.
    5. OPTIONAL: pass a small pitcher of buttermilk for individual drizzlings.