• We’re coming to the close of our CSA Share for the regular season, and while it has been a positive experience, it is sometimes a challenge to find uses for some of the more unfamiliar items in our share. This week I was introduced to Aji Dulce peppers. Looking vaguely like Scotch Bonnet peppers, I wasn’t sure how we would make good use of a half-pint of them.

    However, as I’ve learned this summer, not everything is what it seems. Although there is a bit of heat to an Aji Dulce pepper, they are on the milder side (of hot stuff anyway). As always, Farmer Dave (click the link to explore the CSA options) offers some great ideas for using the produce in our share, this recipe coming from one of the Farm’s crew members, Bonifacio.

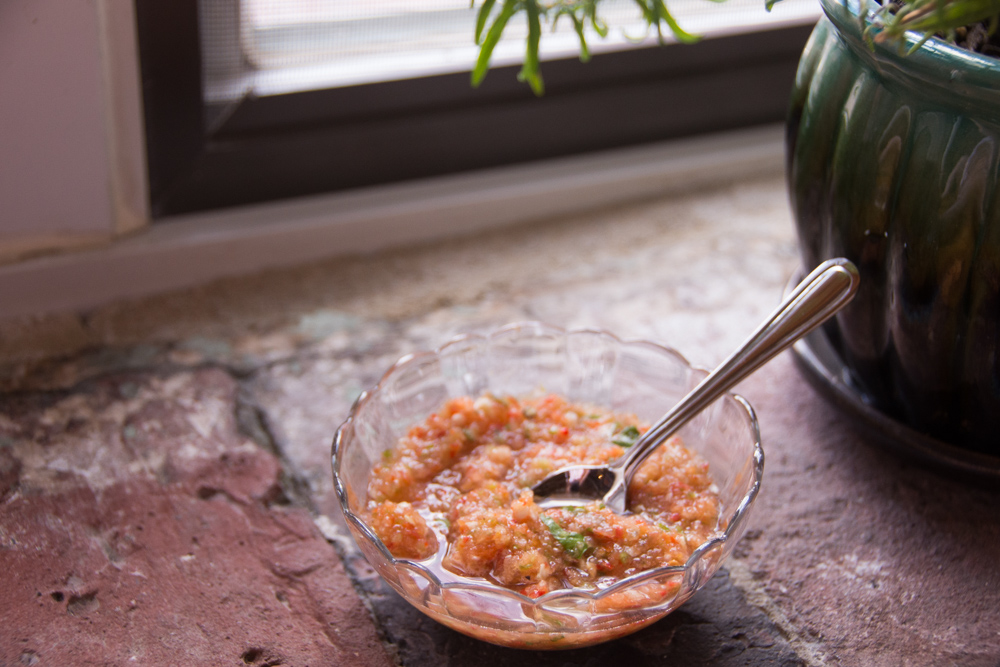
    I turned the whole lot of peppers into a Puerto Rican style Sofrito which will be used to flavor soups and stews all winter long (froze a portion into ice-cube sized portions).

    Bonifacio’s Sofrito (A Traditional Recipe from Puerto Rico)

    Ingredients

    • 1 Green Bell Peppers, seeded and chopped
    • 1 Red Bell Pepper, seeded and chopped
    • 10 or more Ají Dulce Peppers, chopped
    • 20 Cilantro Leaves
    • 2 Medium Tomatoes
    • 2 Medium Heads of Garlic, peeled
    • 2 Onions, chopped
    • Salt and Pepper

    Method

    1. Combine green peppers, red peppers, aji dulce peppers, tomatoes, onions and garlic in a food processor.
    2. Process to the consistency of salsa, not entirely liquified.
    3. Add cilantro, salt, and pepper (and process it a bit more)
    4. Stores well in freezer
  • Some time in the middle of all “THIS” as we refer to our Coronavirus isolation, Adrien began to take-over responsibility of Sunday meals. The rest of the week, I usually plan for and we jointly prepare whatever we are eating. I actually like to cook so it was never a chore once I stopped feeling the pressure from my teaching career. However, apparently I am “too bossy” to work with in the kitchen, so we’ve worked out this arrangement where I stay out of Sunday meal planning and prep.

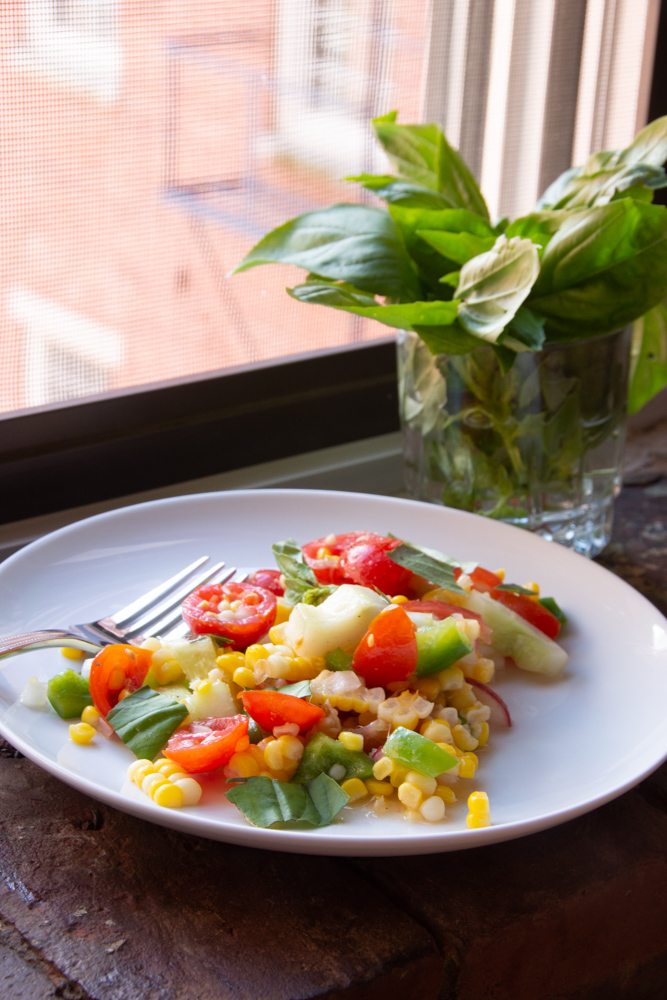
    With a lot of corn in our recent CSA box – and a ton of tomatoes and cukes – Adrien found this salad from Holly Nilsson on the Spend with Pennies website. It is a welcome summer dish and very adaptable to whatever is growing that suits your fancy.

    Easy Corn Salad

    Ingredients – again, add or substitute what you have. If you like kohlrabi in place of cukes, go for it.

    3 TBSP vinegar (cider or rice)

    3 cups of corn kernals from about 4 cobs

    1 cup of quartered cherry tomatoes

    1 cup diced cucumbers

    1/4 cup red onion (we had a vidalia, still tasty)

    3 TBSP olive oil

    3 TBSP cider vinegar/rice vinegar/ or another lighter vinegar (probably not great with darker Balsamic vinegars)

    Salt, Pepper to taste

    1 TBSP fresh parsley

    Dill or basil (optional)

    Method

    Prepare the corn by boiling or grilling and remove the kernals from the cob. Put all of the ingredients into a bowl and toss.

  • In the process of using up an eggplant from our CSA Share yesterday (Google it – there are a million great sounding recipes for roasted eggplant dips), I discovered we had no actual bread in the house. Wheat thins didn’t seem like the appropriate vehicle for a Middle-eastern Dip, so I began looking at exactly what the skill level for Pita Bread might be. Whatever that skill level is, I can tell you that homemade Pita bread is worth the effort. Warm, soft, and with a great homemade bread aroma filling our home, I’m pretty sure we won’t be buying that pre-sealed and often dried out version from our local grocer.

    This recipe comes courtesy of the New York Times and was developed by David Tanis. It is delicious (did I already say that?), and I discovered that by sealing the dough balls in plastic and storing the in refrigerator, I could make fresh-from-the-oven Pita bread the very next day. One suggestion that I found made a huge difference: up the oven temperature to 500 degrees F and set a pizza stone in the oven. Heat that for about 20-30 minutes before baking.

    Homemade Pita Bread by David Tanis, NYT

    Ingredients

    • 2 tsp active dry yeast
    • 1/2 tsp sugar
    • 35 grams (1/4 cup) whole wheat flour
    • 310 grams (2-1/2 cups) all purpose flour
    • 1 tsp kosher salt
    • 2 TBSP olive oil

    Method

    1. Make sponge: Put 1 cup lukewarm water in a large mixing bowl. Add yeast and sugar. Stir to dissolve. Add the whole-wheat flour and 1/4 cup all purpose flour and whisk together. Put bowl in a warm (not hot) place, uncovered, until mixture is frothy and bubbling – about 15 minutes.
    2. Add salt, olive oil and nearly all remaining all-purpose flour (reserve 1/2 cup). With a wooden spoon, stir until mixture forms a shaggy mass. Dust with a little reserved flour, then knead in bowl for 1 minute, incorporating any stray bits of dry dough.
    3. Turn dough onto work surface. Knead lightly for 2 minutes until smooth. Cover and let rest for 10 minutes, then knead again for 2 minutes. Try not to add too much of the reserved flour; the dough should be soft and a bit moist (can be refrigerated at this point for several hours of overnight – bring dough back to room temp, knead into a ball and proceed with recipe).
    4. Clean the mixing bowl and put dough back in it. Cover bowl tightly with plastic wrap, then cover with a town. Put bowl in a warm (not hot) place. Leave dough until it has doubled in size – about 1 hour.
    5. Heat over to 475 degrees F (I upped mine – see note). On bottom shelf of oven, place a heavy duty baking sheet, large cast-iron pan or ceramic baking tile. Punch down dough and divide into 8 equal-sized pieces. Form each piece into a little ball. Place dough balls on work surface, cover with a damp towel and leave for 10 minutes.
    6. Remove 1 ball (keep others covered until using) and press into a flat disk with rolling pin. Roll to a 6-inch circle, then to an 8-inch diameter about 1/8 inch thick, dusting with flour as needed.
    7. Carefully lift the dough circle and place quickly on hot baking sheet. After 2 minutes the dough should be nicely puffed. Turn disk over with tongs or spatula and bake 1 minute more. The pita should be pale, with only a few brown speckles. Transfer warm pita to a napkin-lined basket and cover so bread stays soft. Repeat with the rest of the dough ball.

  • I did a double-take when I spotted this recipe for Yellow Squash (!) Bundt Cake. Yellow squash, seriously?

    But with an enormous haul of yellow squash in our CSA share the last 2 weeks, it felt as if this recipe from Southern Living was meant to be baked. So I did.

    Yellow Squash Bundt Cake (Southern Living)

    Ingredients for Cake

    • 2 cups All Purpose flour
    • 1 tsp baking powder
    • 1/2 tsp baking soda
    • 1/2 tsp salt
    • 3 large eggs at room temperature
    • 1-1/2 cups granulated sugar
    • 1 cup canola oil (I used coconut oil)
    • 2 cups grated yellow square
    • 1 TBS lemon zest plus 2 TBSP lemon juice

    Ingredients for Lemon Buttermilk Glaze

    • 2 cups unsifted powdered sugar
    • 2 TBSP buttermilk
    • 1 tsp lemon zest plus 1 TBSP fresh lemon juice

    Method

    1. Prepare the cake: preheat oven to 350 degrees F. Coat a 10-cup Bundt pan with baking spray (or just oil it). Stir together flour, baking powder, baking soda, and salt in a bowl. Place eggs, sugar and oil in the bowl of a stand mixer fitted with a paddle attachment. Beat on medium-high speed until light and airy (about 3 minutes), stopping to scrape down sides as needed. Stir in the squash, lemon zest and juice. Gradually add flour mixture, beating on low speed until just combined (about 45 seconds). Pour batter into prepared pan.
    2. Bake in preheated oven until a wood pick inserted in the center comes out clean (50-55 minutes). Cool in pan for 10 minutes. Invert onto wire rack and cool for 1 hour.
    3. Prepare the glaze. Whisk together all ingredients into a bowl until smooth. Drizzle over cooled cake.
  • Because we’ve received a really (really, really) large amount of zucchini, I’ve developed a new appreciation for gardeners and the creative recipes so many people share to help use up zucchini crops. We’ve had some delicious muffins (thanks Joanne Chang-Meyers) and today, we baked this delicious and moist Vegan Zucchini Bread recipe from the website Nora Cooks.

    One-Bowl Vegan Zucchini Bread

    Ingredients

    • 1/4 cup canola oil (also suggested were coconut oil, vegan butter or applesauce for those wanting to bake oil-free version)
    • 1/3 cup almond milk
    • 1 TBSP ground flaxseeds
    • 1 cup brown sugar
    • 2 tsp vanilla extract
    • 1 cup grated zucchini (about 1 medium)
    • 1 1/2 cups white or whole wheat all-purpose flour
    • 1/2 tsp baking powder
    • 1/2 tsp baking soda
    • 1/2 tsp salt
    • 1 tsp cinnamon
    • OPTIONAL: 1 cup dairy free chocolate chips or walnuts

    Method

    1. Preheat oven to 350 degrees F. Line a standard 9×5 loaf pan with parchment or spray with oil.
    2. In a large bowl, add the oil, almond milk, ground flaxseeds, brown sugar and vanilla. Whisk well until combined.
    3. Lightly blow the grated zucchini with paper towels and add to the bowl. Stir the zucchini into the wet ingredients.
    4. Now add the flour to the wet ingredients. Sprinkle the baking powder, baking soda, salt and cinnamon on top of the flour. Stir gently until just combined, being carful not to over-mix or the loaf will be too dense.
    5. Fold in walnuts or chocolate chips if using. Pour into the prepared pan, and bake for 45-55 minutes, or until a toothpick inserted in the center comes out clean.
    6. Let it cool in the pan for a few minutes, then transfer the loaf to cool on a rack. Slice and enjoy.

    Can also be made into muffins (12). Oil a muffin pan, spoon batter nearly to the top of each muffin cup and bake at 350 for 15-20 minutes.

  • If necessity is the mother of invention, then overabundance is the brainchild of resourcefulness.

    This week our CSA share was filled with zucchini squash. In an effort to not waste a single thing, I turned to using zucchini in baked goods. After all, isn’t that what everyone does with an over-abundance of zucchini?

    Joanne Chang’s Flour Bakery shares a killer Good Morning muffin in the first Flour Bakery cookbook. While similar to the morning glory muffins, this one is chock full of fruits, nuts, and…. zucchini.

    Good Morning Muffins

    • 1/2 cup wheat bran
    • 1/2 cup hot water
    • 1 small zucchini, grated (about 1 1/2 cups)
    • 1/2 cup raisins
    • 1/2 cup pecan halves, roughly chopped and toasted
    • 1 apple, peeled, cored and chopped (about 1 cup)
    • 2/3 cup packed light brown sugar
    • 3 eggs
    • 3/4 cup canola oil
    • 1 tsp vanilla
    • 1 1/2 cup unbleached all purpose flour
    • 3/4 cup old-fashioned oats
    • 2 tsp baking powder
    • 1/2 tsp kosher salt
    • 1/2 tsp cinnamon

    Method

    1. Position a rack in the center of the oven and heat oven to 350 degrees F. Butter a standard 12-cup muffin tin, coat with non-stick spray or line with paper liners.
    2. In a medium bowl, stir together the wheat bran and hot water until the bran is completely moistened. Add zucchini, raisins, pecans, coconut, and apple. Stir until well mixed.
    3. Using a stand mixer fitted with the whip attachment, beat together the sugar and eggs on medium speed for 3-4 minutes or until the mixture thickens and lightens. On low speed, slowly drizzle in the oil and then the vanilla. Add it slowly so as not to deflate the air you have just beaten into the eggs (should take about a minute). Remove from the stand mixer.
    4. In medium bowl, stir together the flour, oats, baking powder, salt and cinnamon until well mixed. Add the flour mixture to the egg mixture and fold carefully just until the dry and wet mixtures are well combined. Then add the bran mixture and fold again just until well combined. Spoon the batter into the prepared muffin cups, dividing it evenly and filling the cups to the rim (almost overflowing).
    5. Bake for 35 to 45 minutes or until the muffins are lightly browned on top and spring back when pressed in the middle with a fingertip. Let cool in the pan on a wire rack for 20 minutes, then remove the muffins from the pan.
    6. The muffins taste best the day you bake them, but then can be stored in an airtight container at room temperature for up to 3 days. If you keep them for longer than one day, refresh them in a 300 degree F oven for 4 to 5 minutes. Or you can freeze them, wrapped tightly in plastic wrap for up to 1 week; reheat, directly from freezer in a 300 degree F oven for 8-10 minutes.
  • Melissa Clark, who has been contributing to the New York Times Food Columns since 2007, has a wonderful new cookbook out this summer – Dinner in French. Inspired by time spent by her family in France, the recipes included in this book were just what we needed this summer as we limited our outside worldly travels to self-quarantining during COVID-19. If you, like us, are missing traveling and all things France, this is one way to be transported.

    Gazpacho by Way of Provence is a perfect combination of watermelon, fresh tomatoes, shallots, garlic and basil. Topped with fresh crouton, more fresh basil, and a drizzle of olive oil, it was a perfect dinner for a very warm summer night.

    Unlike the Spanish versions, there are no cukes and the sting of jalepeno, while included, is less pronounced. This one is definitely going into our summer rotation. The recipe can be found in the link below; however, if you love French food and French cooking, the book is a great investment – and you won’t be disappointed.

    https://www.melissaclark.net/books

  • When we owned our Westford house, we always had a vegetable and herb garden. Among the things we grew were chives – and those of course grew prolifically. I love chives and added them to cottage cheese and egg dishes and as a garnish for soups. When we picked up our CSA share this weekend, we received a rather large bunch of beautiful chives, so of course I felt challenged to find a way to use them.

    As one who enjoys baking, when I came across this recipe for a savory scone which would also make good use of our chives, it seemed liked this recipe was calling to me.

    Whole Foods Cheddar and Chive Scones

    Ingredients

    • 1/2 cup milk plus 2 TBSP for brushing over scones
    • 2 large eggs
    • 2 TBSP finely chopped chives (I used 1/4 cup and liked the density better)
    • 2 cups flour
    • 1 TBSP baking powder
    • 1 tsp fine sea salt
    • 1/2 tsp ground black pepper
    • 6 TBSP chilled butter
    • 1 1/2 cups grated sharp or aged cheddar cheese

    Method

    1. Preheat oven to 425 degrees F.
    2. In small bowl, whisk together 1/2 cup milk and the eggs until blended.
    3. Stir in chives and set aside. In another bowl, whisk together flour, baking powder, salt and pepper.
    4. Cut in cold butter with a pastry blender until resembling coarse meal. Stir in cheddar cheese.
    5. Add milk mixture and stir just until moist clumps form (do not overmix or scones will be tough).
    6. Trun out dough onto a lightly floured surface and shape into a ball. Cut dough in half and flatten each half into a 8-inch round 1/2 inch thick.
    7. Cut each round into 6 wedges and place the wedges on a parchment lined sheet.
    8. Brush tops of scones with milk and sprinkle with remaining cheese.
    9. Bake 12 to 15 minutes or until golden brown.

  • It’s strawberry season in New England! Along with shortcake and whipped cream, the possibilities are endless.

    Back when I used to go to strawberry fields and pick outrageously large quantities of strawberries, I would make jar upon jar of strawberry jam. The ruby-red jam bubbling in a pot would emit the most wonderful smell: warm, steamy, and sweet. Pulling this cake out of the oven after an hour brought me right back to those days. Top off the warm cake with a little vanilla ice cream or whipped cream and you will not be disappointed.

    Rather than the traditional biscuit, this is more of a buttery pound cake and it is delicious! And come on, you can’t go wrong with Martha Stewart!

    Martha Stewart’s Strawberry Cake

    Ingredients

    • 6 TBSP unsalted butter, softened; plus additional for the pie plate
    • 1 1/2 cups all purpose flour
    • 1 1/2 tsp baking powder
    • 1/2 tsp salt
    • 1 cup plus 2 TBSP sugar
    • 1 large egg
    • 1/2 cup milk
    • 1 tsp vanilla extract
    • 1 pound strawberries, hulled and halved

    Method

    Preheat oven to 305 degrees. Butter a 10-inch pie place. Sift flour, baking powder, and salt together into a medium bowl.

    Put butter and 1 cup sugar into an electric mixer bowl. Mix on medium-high speed until pales and fluffy – about 3 minutes. Reduce speed to medium-low, mix in egg, milk and vanilla.

    Transfer batter to pie place. Arrange strawberries on top of butter, cut sides down and as close together as possible. Sprinkle remaining 2 TBSP sugar over berries.

    Bake cake 10 minutes. Reduce oven temperature to 325 degrees. Bake until cake is golden brown and firm to the touch (about 1 hours). Let cool in pie place on a wire rack. Cut into wedges.

  • Up until about a week ago, we have been without an oven for about two months. As you can imagine, that put quite a damper on baking during our self-quarantine; no home-baked bread, and no morning baked treats. Happily, we were able to resolve some installation issues in our kitchen and now have a working stove and oven at the ready.

    One of my favorite breakfast pastries is a scone, so it seemed like the celebration of a return to baking should include a batch of them. This is my current favorite recipe, a guide really, for scone-making. It includes some really helpful techniques that result in flaky, buttery scones and can be adapted for different add-ins and flavors of sweet scones.

    Sally’s Baking Addiction: How to Make Perfect Scones

    Ingredients

    • 2 cups all-purpose flour (spooned & leveled)
    • 1/2 cup granulated sugar
    • 1/2 tsp salt
    • 2 1/2 tsp baking powder
    • 1/2 cup unsalted butter (FROZEN – this is key)
    • 1/2 cup heavy cream or buttermilk (plus additional for brushing)
    • 1 large egg
    • 1 1/2 tsp pure vanilla extract
    • 1 cup to 1 1/2 cups add-ins (chocolate chips, berries, fruits, nuts, etc.)
    • OPTIONAL: 1/2-1 tsp ground cinnamon, coarse sugar, toppings/icings etc.)

    Method

    1. Whisk flour, sugar, salt, and baking powder together in a large bowl. Grate the frozen butter using a box grater. Add it to the flour mixture and combine with a pastry cutter (2 forkes, fingers) until the mixture comes together in pea-sized crumbs. Place this mixture in the refrigerator or freezer as you mix the wet ingredients together.
    2. Whisk 1/2 cup cream/buttermilk, egg and vanilla extract together in a small bowl. Drizzle over the flour mixture, add the add-ins of choice, then mix together until everything appears moistened.
    3. To make triangle scones pour onto counter and, with floured hands, work dough into a ball as best you can (dough will be sticky). If too sticky, add a little more flour, if too dry, ad 1-2 more Tbsp cream. Press into an 8-inch disk and cut into 8 wedges.
    4. To make 10-12 drop scones keep mixing dough in the bowl until it comes together. Drop scones, about a 1/4 cup of dough each, 3 inches apart on a (parchment) lined baking sheet.
    5. Brush with milk.
    6. Meanwhile preheat over to 400 degrees F. Drop scones or place triangle cut scones on parchment lined sheet and refrigerate while oven preheats.
    7. Bake for 18-26 minutes or until golden brown around the edges and lightly browned on the top. (Larger scones will take 25 minutes or so). Remove from oven and cool a few minutes before topping (optional).
    8. Leftovers will keep at room temperature for 2 day or in the refrigerator for 5 days.